
 Download App
Before you go live: hit record
Every follow-up depends on one thing you do before the session starts. If nobody pressed record, there's no replay to send. Here's how to record a webinar in the 3 tools communities use most, checked against each vendor's help pages in November 2026.
Zoom
- Cloud recording needs a licensed user on a paid plan (Pro, Business, Education or Enterprise). On a free account, record to your computer instead: Zoom's computer recording is available on all accounts.
- Make sure cloud recording is turned on in your Zoom settings (Recording tab). An admin can lock this setting for the whole account.
- Start the meeting as the host. Only hosts and co-hosts can start a cloud recording.
- In the meeting controls, click More, then Record, then Record to the cloud.
- After the meeting, find the file under Recordings & Transcripts in the Zoom web portal, or in Zoom Hub in the desktop app. Zoom says processing usually takes about twice the length of the recording, and can take up to 24 hours.
Zoom also has an automatic recording setting, so you can't forget. On a free account, automatic recording only works to your computer. If a co-host starts a cloud recording, it shows up in the host's recording list.
Google Meet
- Recording is available on specific Google Workspace editions (such as Business Standard, Business Plus and Enterprise plans), Workspace Individual and Google One plans with 2 TB or more. A Workspace admin has to allow recording for your account. Check Google's list for your plan.
- Join or start the meeting as the host, or as someone the host allows to record.
- At the bottom right, click Meeting tools, then Recording, then Start recording, and confirm with Start. Everyone in the call is notified.
- To stop, open Meeting tools, then Recording, then Stop recording. Meet also stops after 8 hours, or when everyone leaves.
- The file is saved to the organiser's Google Drive. The organiser and the person who started the recording get an email with the link, and the link is added to the Calendar event.
YouTube Live
- Your channel must be verified and enabled for live streaming, with no live streaming restrictions in the past 90 days. You must be 16 or older.
- Click Create, then Go live. For a webcam stream, choose Webcam in the left menu.
- Set the title, description and visibility: public, private or unlisted (only people with the link can watch).
- Click Go live, and End stream when you finish.
- YouTube archives streams under 12 hours automatically. If a stream runs longer than 12 hours, it may not be captured at all. You can change the replay's visibility later in YouTube Studio.
What a webinar follow-up email should include
Send it within 24 hours, while the session is still in people's heads. Send one message to everyone: the people who attended want the deck and the links; the people who missed it want the replay.
The replay
A link to the recording. If the recording isn't processed yet, say when it will be.
The 3-line summary
What was covered, so people can decide whether to watch.
The deck and links
Slides and every resource the speaker mentioned, in one place.
The next session
Date, time, topic and speaker. The follow-up is your best announcement slot.
Leave out the long thank-you paragraph and the survey with 12 questions. One line of thanks and one question at most.
Webinar follow-up email template
Subject: Replay + slides: [session title] with [speaker]

Hi [first name],

Thanks to everyone who joined [speaker] yesterday. If you missed it, everything is below.

Watch the replay: [link]
Slides: [link]

In 3 lines:
- [Main point 1]
- [Main point 2]
- [Main point 3]

Short on time? Jump to [00:00] for [the part about X].

Resources [speaker] mentioned:
- [Link 1]
- [Link 2]

Next session: [title] with [speaker], [day, date, time + time zone]. [Link to add it to your calendar]

One question: what should we cover next? Just hit reply.

[Your name]
[Community name]
Webinar follow-up post for Telegram
If your community lives in Telegram, the chat is where people will actually see the follow-up. Keep it shorter than the email, put the links up front, and pin it until the next session.
[Session title] replay is up

Speaker: [name]
Replay: [link]
Slides: [link]

The short version:
1. [Main point 1]
2. [Main point 2]
3. [Main point 3]

Best moment: [00:00], [what happens there]

Next: [title] with [speaker], [day, date, time + time zone]

Questions for [speaker]? Reply to this post and we'll pass them on.
How to repurpose webinar content in 4 ways
One session can feed your community for weeks. These 4 cost the least effort for the most use.
1. A summary post
Turn the 3-line summary into a standalone post a week later: one idea from the session, with a link to the replay at the right minute.
2. Short clips
Cut the 2 or 3 best answers into 1-minute clips. Use the timestamps you noted during the call.
3. A Q&A doc
Write up the questions and answers as a short doc. It answers the next member who asks the same thing.
4. A speaker page
Collect the bio, links and every session the speaker gave on one page they can share. See speaker pages.
For a ready format for the summary and Q&A, use the event recap template.
The archive: why one-off follow-ups disappear
The follow-up email gets opened once. The Telegram post scrolls away in a few days. Three months later, a new member asks "was there ever a session about pricing?", and the honest answer is "yes, somewhere".
The pieces of one webinar end up in 5 places: the Zoom cloud or the host's Drive, an unlisted YouTube link in the chat, a PDF of the slides in another message, the speaker's bio in an old announcement, and the notes in someone's head.
Follow-ups only
- Each session lives in one email and one post
- The recording sits in the host's account and may be deleted
- New members can't see anything from before they joined
- Finding an answer means scrolling or asking again
A session library
- Each session is a page: video, transcript, summary, deck, links
- Pages sit in spaces like "Weekly calls 2026" and "Guest sessions"
- New members get the whole archive on day 1
- Search covers what was said in every session
That's what Embedify does. You keep running the webinar in Zoom, Meet or YouTube Live. You upload the recording to YouTube (unlisted works) or Vimeo, and add it to a session page in Embedify. The page gets a transcript and an AI summary, the deck sits next to the video, and members open it from your Telegram group without leaving the chat.
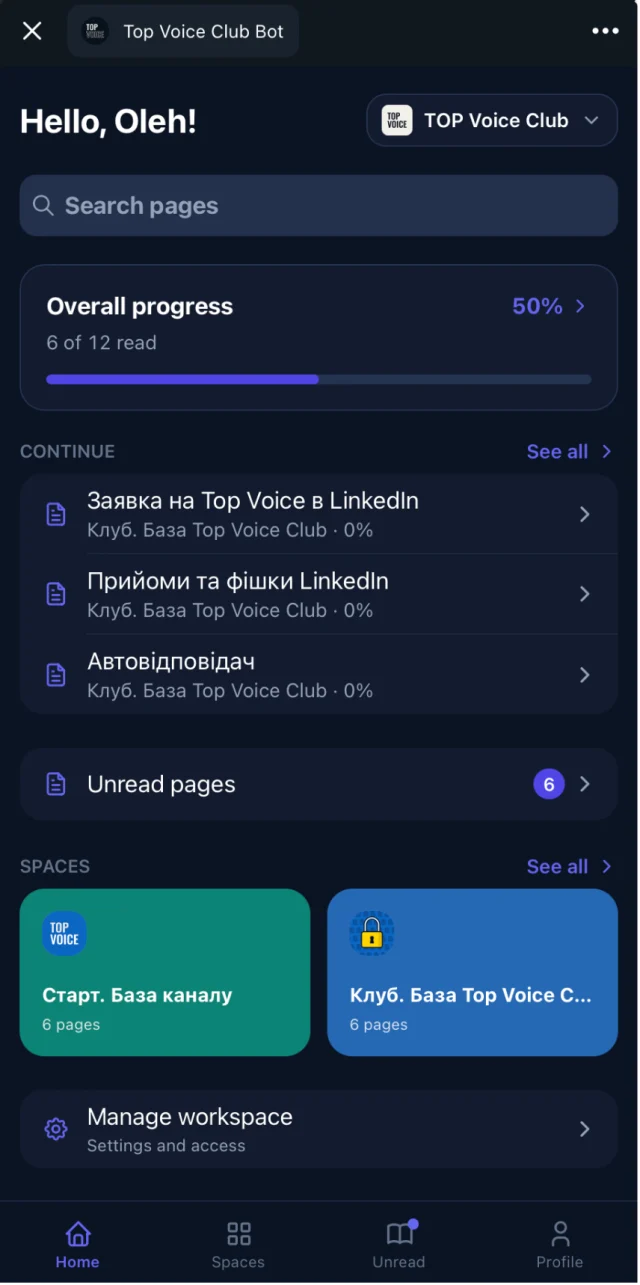
Access groups decide who sees the replays, so paid sessions stay with paying members. Members of your Telegram group get access automatically, and lose it when they leave. Your follow-up post then links to a page that stays put, instead of a file that expires.
Embedify doesn't record, host or stream webinars. It organises what your webinar tool produced. Speaker pages and meeting summaries are on the Pro plan; see pricing. For the full setup, see the webinar recording library and how to share Zoom and Google Meet recordings.
A webinar follow-up checklist
Before
Check recording is allowed on your plan, turn on automatic recording if your tool has it, and ask the speaker for the deck.
Within 24 hours
Send the webinar follow-up email and the Telegram post with the replay, deck, summary and next session.
Within a week
Publish the session page with the recording, transcript, summary and deck, and link it from the speaker page.
Over the next month
Repurpose: one summary post, 2 or 3 clips, and a Q&A doc.
Sources
- Zoom Support: Starting a cloud recording
- Zoom Support: Enabling cloud recording
- Zoom Support: Getting started with computer and cloud recording
- Zoom Support: Enabling and disabling automatic recording
- Google Meet Help: Record a video meeting
- YouTube Help: Create a live stream via webcam
- YouTube Help: Get started with live streaming
- YouTube Help: Archive live streams